TaskAnyone User Manual
What is TaskAnyone?
When you use email to ask someone else to do something for you it is a fire and forget event. There is no accountability and no tracking. TaskAnyone allows you to send tasks to people over email in a trackable and traceable way so that nothing gets forgotten or falls through the cracks. It is also an excellent way to track and complete your own personal tasks so that you can keep yourself productive too.Getting Started
Getting started with TaskAnyone takes minutes if not seconds and you don't need to get your IT department involved to get you going, the following steps can easily be completed by anyone:- Register your account
- Validate your email
- Create and send your first task
Register your account
To create a fully functional 15 day trial account with TaskAnyone, just go to our homepage (www.taskanyone.com)and type your email into the registration box.Validate your email
Within seconds of registering an email will be sent to you (if it takes longer than 60 seconds be sure to check your spam or junk folder in case it got placed there accidentally). In the email click on the hyperlink that says "Yes I created this account...". On the page that comes up you will need to provide a password and your name (you can also provide a license code if someone else in your company has already purchased a license for you).Once you enter this information logged in to your Task list page and your account is fully active.
Your trial period
Once your account is up and running you will have 15 days in which you have full and unlimited use of the service. After your 15 day trial expires, you will still be able to log onto the service to check your tasks but you will be unable to make any new tasks until you purchase a licenseCreate your first task
Creating tasks in an online system such as this has to be simple and fast! Once you log in, this is the page you will see: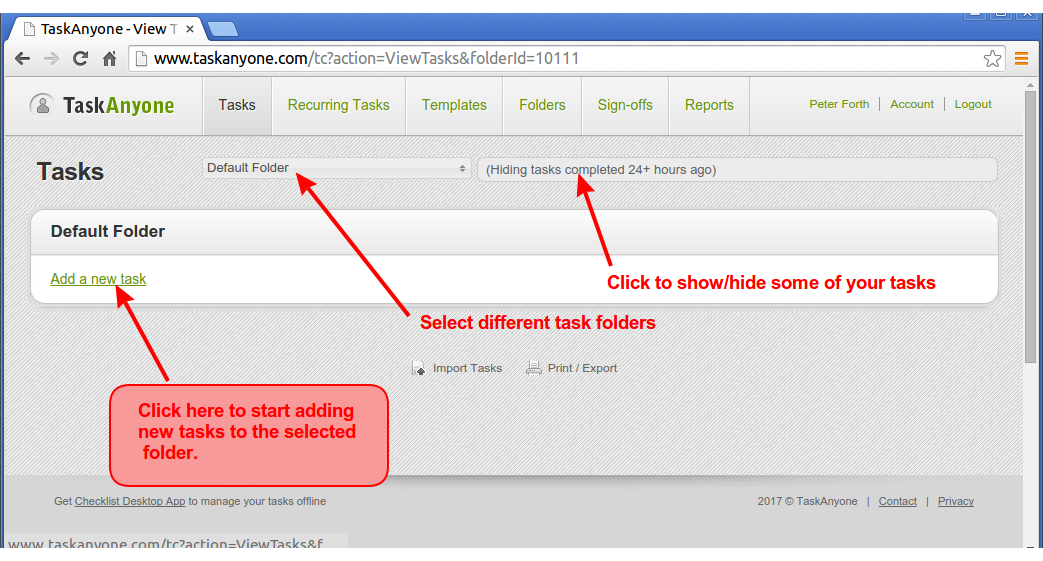
To add a task, just click the "Add new task" link. When you click it, it will expand to the light green box shown below:
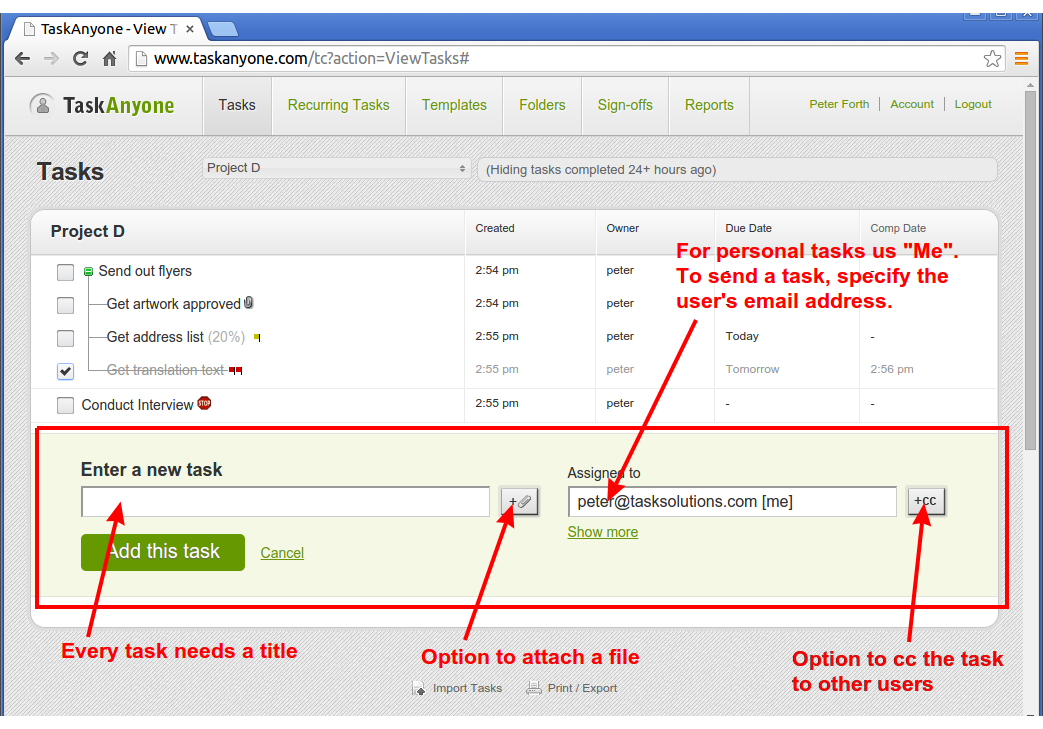
To create a personal task, just type in your task title and click the "Add task" button. The task will instantly appear in the list above it. You won't even have to reload the page! You can create tons of tasks very quickly in this way.
If you want to send a task to someone else, just type their email address into the Assigned To box--they don't have to have a TaskAnyone account for you to send them a task.
The first time you send a task to someone they are added into your Contact list and you will be able to quickly select them from a handy popup window the next time you need to send them a task.
Task list page
This is where you can see a list of all your tasks and where you will spent the bulk of your time in TaskAnyone. You can get to these pages from your homepage by clicking on any of your folders or on any of the links in your dashboard.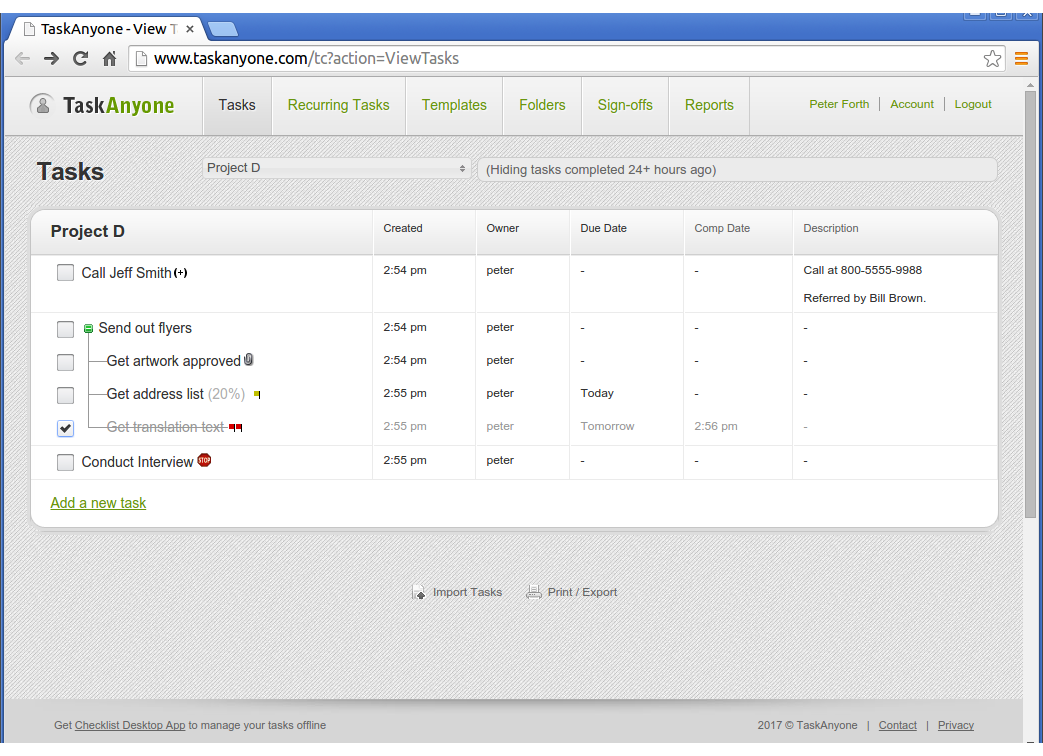
The Task List
We have strived to keep the list of tasks looking as clean as possible. Most task information is displayed on a single line with additional descriptive text displayed in collapsable and distinct blue boxes. It is also important to note that tasks can be organised into trees that go as deep as you need them to.Columns
Task information is displayed in multiple columns some of which are automatically hidden if none of the task's being shown has need of them. For example if none of your tasks has a due date assigned then the due date column will not be shown. This helps to keep your Task list as clean and uncluttered as possible. The list of TaskAnyone columns is customizable from the Accounts pages and includes:- Task - This column is always shown and displays the task title and task tree graphics. Clicking on the task title will edit the task.
- Status - Shows the task's current one line status. Clicking on the status allows you to change it.
- Creation Date - Shows when the task was created.
- Times - Shows estimated and completion time
- Due Date - Shows the due date if the task has one
- Assigned To - Who is the task assigned to? Click the current owner to reassign the task.
- Sent By - Who made and sent the task
Folders
Your TaskAnyone tasks are grouped into different folders. In your Task list view, you can choose to view either one folder at a time or all of them at once. Selection is made using the following drop down box: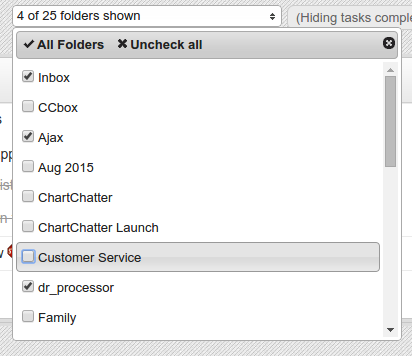
There are two different types of folders: standard folders such as your inbox are provided by the system and cannot be deleted or shared and custom folders that you make yourself.
Standard folders:
- All folders - A very useful view that shows every task in every folder that you have access to.
- Inbox - the default folder where tasks that people assign to you are placed.
- Outbox - the default folder for tasks that you assign to other people
- CCBox - the default spot for tasks that you have been cc'ed on
Description boxes
If a task has a description or notes then a clickable "..." will follow the task title, if you click on this then the additional text will be displayed in a distinctive blue box underneath the title. This additional text is hidden by default but you can use "Show" or "Hide" all detail boxes link in the top right hand corner to quickly show or hide all the boxes in your list.Completing tasks
There are several ways to complete a task but the easiest is to click on the checkmark next to it in your task list. When you complete a task, any subtasks underneath it will be automatically completed as well.Task menu
If you click the tool icon to the left of a task, the following popup menu will appear: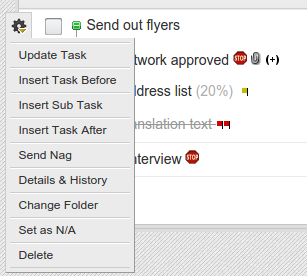
This menu allows you to update or edit the task, insert a new task (either before, after or underneath the current one), send a nag, or view the task's history.
Nagging
The ability to request updates from or "nag" people that you have sent tasks to is an incredibly useful tool for managers who want to know what is going on with the tasks that they have sent out.To send an update request on a task, hover over the task and select "Send Nag" from the task menu. You will be prompted to give a custom message that will appear in an update request email that is sent to the owner of the task.
TaskAnyone is the first online task management system to build an on demand nagging function and has a patent pending on this feature.
Uncompleting tasks
A special task menu appears when you click the tool icon of a completed task that will let you uncomplete the task.Deleting tasks
You can delete a task using the task menu. If you delete an uncompleted task that is either created by or assigned to someone else, then they will get an email alerting them that the task was deleted.Drag and Drop
Task lists can be reordered and tasks can be moved from folder to folder by simply executing a "drag and drop" action.To move tasks around within a folder (e.g. change the ordering):
- Begin dragging the task by clicking on it and holding down the mouse button.
- Keep the button down, and drag the cursor over another task in the task list.
- Once your mouse cursor is over the destination task, release your mouse button, and the task you are dragging will be placed immediately after the task you are dropping it onto.
Changing Folders
The task menu for top level tasks that you have write permission on also contains a Change Folder option that allows you to quickly move the task (and all its subtasks) into a different folder.Sorting Tasks
You can click on the column headings in your task list to turn sorting on and off. You can sort your tasks alphabetically, by status, folder, creator (from), owner (assigned to), creation date and due date.Note that you cannot drag and drop within your task list when you have sorting turned on and are sorting by anything other than the folder.
In TaskAnyone, sorting preserves Task trees. All the top level tasks will be sorted together and each group of child tasks will be sorted individually. A child task will always fall underneath its parent task, regardless of sorting.
Filtering Tasks
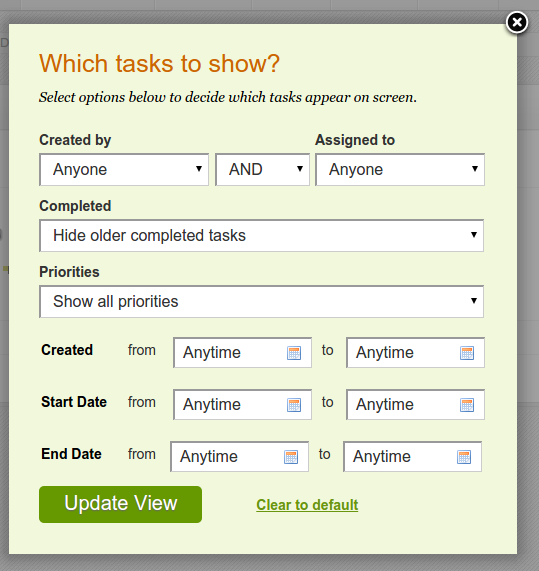
If you click on the "filters" button in the top right of the Task list a popup will appear that will allow you to change the criteria in which tasks are displayed. This can be used to, for example, display only tasks that are assigned to a particular user or that are due on a particular date.
|
Some interesting filter settings for you to try include:
|
Printing
At the bottom of the task list there is a "Print/Export" link. This link has a popup menu that allows you to view a:- Printable list - View your task list on a webpage designed for printing.
- Bulleted Overview list - This will show your tasks shows your tasks in an overview/summary format that looks very similar to a Powerpoint presentation (Note that because this is a task overview, it is not designed to show all the possible elements of each task).
- Export to Excel - Export your tasks to a CSV file that is readable by Excel.
- Export to XML - A useful format for developers.
Creating tasks
Whether you are making tasks for yourself or are sending them to other people we make it easy. There is no need to sort your tasks into dedicated projects or folders, or to fill out multiple fields. By default tasks go into your inbox or outbox and you only need a fill in a title and receipant--it's just as easy as sending an email.Adding tasks
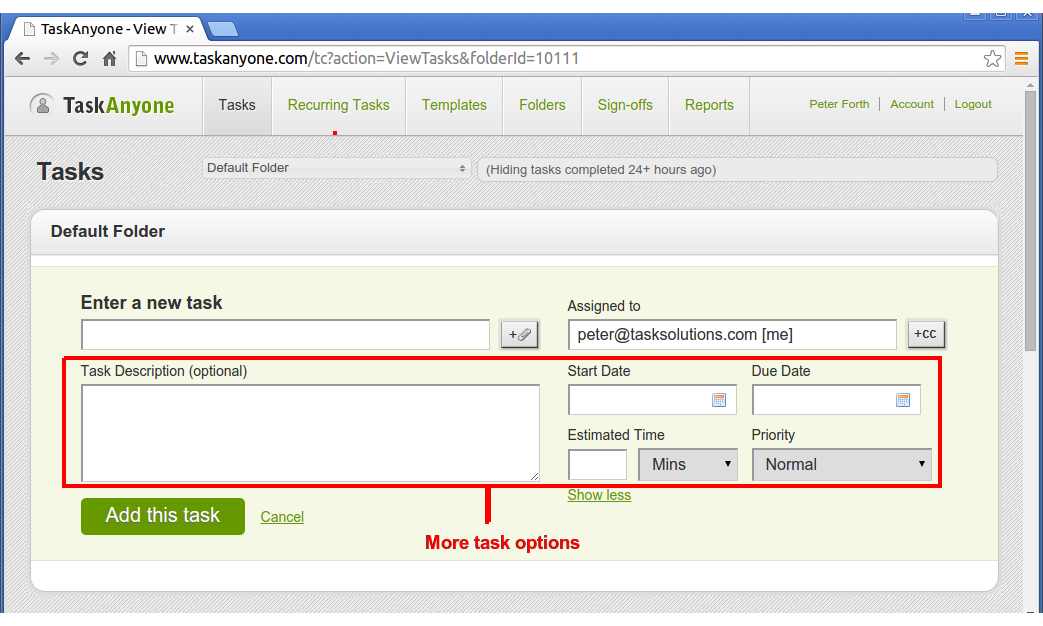
The primary method of adding a task is shown in the section "Adding your first task" and will append tasks to the end of a folder. You can also add tasks either before or after another task using the task menu.If you wish to add more details than just a task title you can click on the "more options" link. This will allow you to specify an optional description, notes, priority, start date, due date and estimated time:
Adding Subtasks
You can create a subtask underneath a parent task by using the "Insert task" command in the task menu. TaskAnyone allows you to make as many levels of subtasks as you need in order to properly describe your project.Contact list
Whenever you click on the "assigned to" or "cc" fields while you are creating a task (or reassigning one) a popup appears that provides a list of previous emails that you have sent tasks to that match the text that is currently in the edit box. For example if your "assigned to" field and type the letter 'a', the Contact list popup will display all the emails in your list that start with the letter 'a'. If you add another letter 'b' then the list will be reduced to all emails that start with "ab". If you see the email you want in the list, just click on it to avoid having to type it all into the box manually.People are automatically added to your address book if you send a task to them. If you want to add to, edit or delete from this list directly, it is accessible from the Contact list tab.
Multiple task owners
When creating Tasks you can specify more than one email address in the "assigned to" box (each email should be seperated by a comma or semi-colon). If you do this you will create a single task that is assigned to multiple people. Each task can have up to 5 owners.In the Intranet version of our product it is also possible to create User Groups" to represent teams in your company and then assign tasks to those teams.
CCing tasks
Simply click on the "cc" link next to the "assigned to" box to copy additional people on the outgoing task. The person that is copied on the task can only view the status of the task and cannot change, delete, accept, or reassign the task.One great use of CC is when someone verbally asks you to do something you can create a task that is assigned to yourself (set the owner to "me") and then cc the person who asked you to do it, that way they will get emails when you update or complete the task.
Location of new tasks
When you are sent a task by someone else it will appear in your inbox (or ccbox if it was cc'ed to you) unless:- The creator has put it in a folder that has already been shared with you.
- The task is a subtask of a task that has already been sent to you and is not in your inbox or ccbox.
Create tasks by Email
If you send an email to tasks@taskanyone.com, it will create a new personal task in your account. The subject of the email will be the title of the task and the body will be the description. If any line in the body starts with "start date", that will become the new task's start date. "due date" or "end date" becomes the new tasks due date. "Folder" becomes the folder that the task will be placed in (if not specified it will go in your default folder).TaskAnyone emails
Email alerts when things change is central to the functioning of TaskAnyone because it allows people to keep track of what is going on without constantly needing to log into the website.When you send a task to someone who is not familiar with TaskAnyone it has to be very simple for them to respond. For this reason TaskAnyone emails all contain encoded hyperlinks that allow you to instantly log on and access TaskAnyone functionality like task completion or updating with a single click of the mouse! This means that the person who is receiving the task does not need to have setup a TaskAnyone account or password in order to complete the tasks you send them.
Receiving a task
When someone sends to a you from TaskAnyone you will receive an email that contains the relevant task information (task title, description, notes, priority, start date, due date, estimated time etc).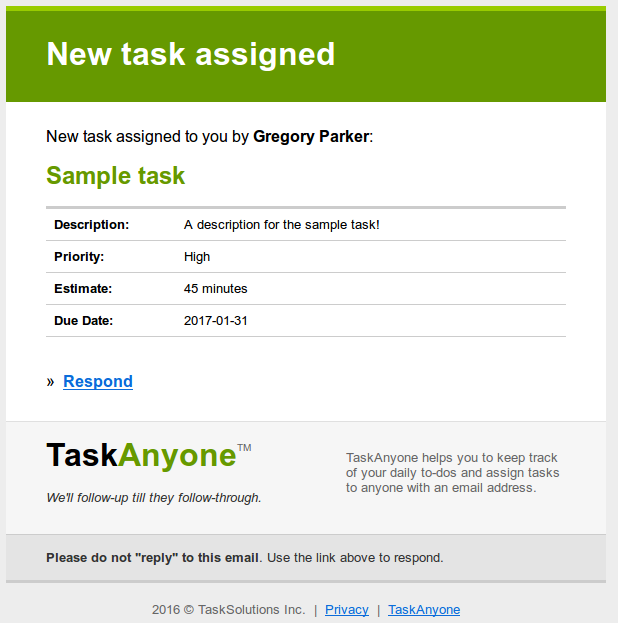
Underneath the task information is a large green "Respond" button that you can use to respond to the incoming task (Note that if you have an account and are frequently logged into the website you might not even use the buttons in this email and instead choose to update the task directly from your task list).
When you send someone a task, the new task email comes directly from your email address. This means that if there is a problem with the receipant's email address the bounce back will go directly to your email account. It also means that the user may choose to simply use their email program to "reply" to the task email. This is not recommended because this will bypass the TaskAnyone system and go straight to your inbox email. The task will remain uncompleted and untracked.
Task Change emails
Whenever a task is updated (whether by changing a field, completing or deleting it) there are notification emails that are sent out to the other people associated with the task so they know it has been changed.
It should be noted that a notification of deletion is only given if a task is deleted before it is completed. This means that if you want to clear out your task list and delete a bunch of completed tasks you won't generate a flood of notification emails.
CC'ed task emails
If you are CC'ed on a task you will get emails that are similar to the emails that the task's owner gets only they will be clearly marked as "cc" and instead of options to accept/update/complete the task there will be only a single option to view the task's details.Nag Emails
When someone sends you a nag to get a task done you will receive a nag email that starts with a personalized message from the person who sent the nag. You can click on the "Respond" button to go to the Respond to task page and update the task.
View Tracking
You can sometimes tell if someone has seen your task or nag even if they don't click on anything to respond. Our emails contain an "external image reference" that allows our servers to know when a new task or nag email is first viewed by its receipiant. When this occurs the task's status will be updated to "viewed" and if you examine the Task's history you will be able to see the exact time that this occurred. No more will people be able to use the excuse "I didn't see it" when you ask them about the task you sent them. (Note that this functionality only works in some email clients, depending on whether or not the client has external images turned on or off).Task tracking in this way has never been done before and we have a patent pending on this procedure.
Daily Status
At midnight (EST) TaskAnyone sends out a "Daily Status" email to everyone in our system who has a task due (or overdue) that day. This allows you to arrive in the morning and immediately be reminded about what you have to do that day. The Daily Status email contains one or two task lists (one for tasks assigned to you, another for tasks that you have assigned to others). The email also contains a button that login you directly into your task list page and sets the filters on that page to show you the same list of due tasks that appears in the email itself.If you want to stop getting your Daily status email you can turn that off in the alert section of your account tab.
Updating Tasks
You can update or modify your tasks either by logging in and accessing them from a web browser or by clicking on "Respond" or "Go to Task" buttons in TaskAnyone notification emails. This section outlines the different ways you can update your tasks.Responding to tasks
When you click the respond button when you get a new task email, the first thing it will usually ask you to do is to Accept or Decline the task.After you've accepted the task, you are presented with the "Respond to task" webpage:
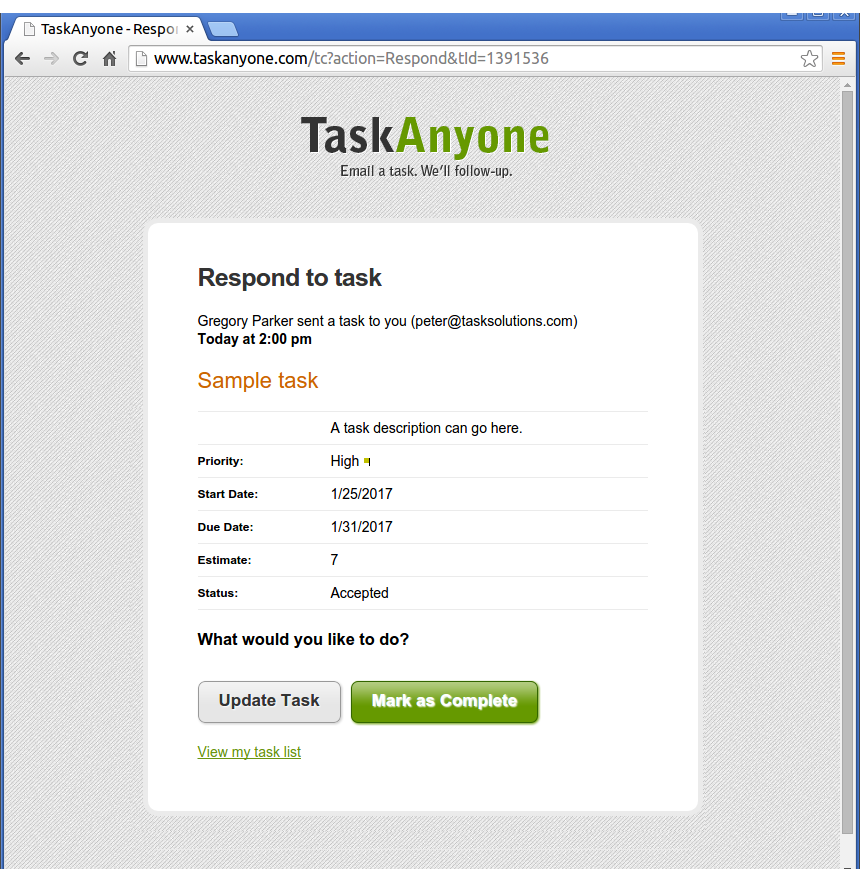
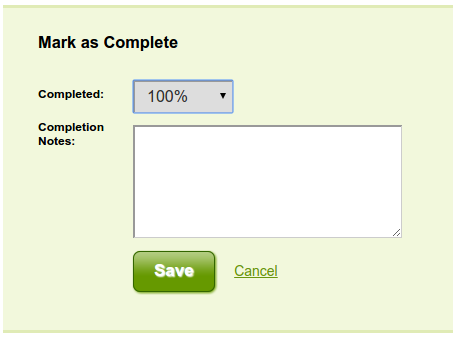
On this page you can either select "Update" to go to the Update task page, or you can press the "complete" button which allows you to complete the task immediately as well as to enter optional completion notes:
Accepting and Declining tasks
When someone sends you a task you are given the option of accepting or declining it.
If you:
- Accept the task - you are communicating that you will eventually begin work on the sent task. The status of the task will be set to "accepted".
- Decline the task - you are communicating that you don't accept that task and that you will not work on it. The task owner will be set to "no one", the task will disappear from your inbox and the task sender will see "declined" as the status of the task.
For some teams you might want to automatically accept any tasks that are assigned to you. If this is your prefence you can check the auto-accept box found on the Account -> Prefences page.
Update Task page
If you have write permission on a task, you can get to the Update task page from the Task Response page, by clicking on the task in your task list or by using the "Update Task" option in the task menu. From here you can all of the task's elements including title and description, notes and more.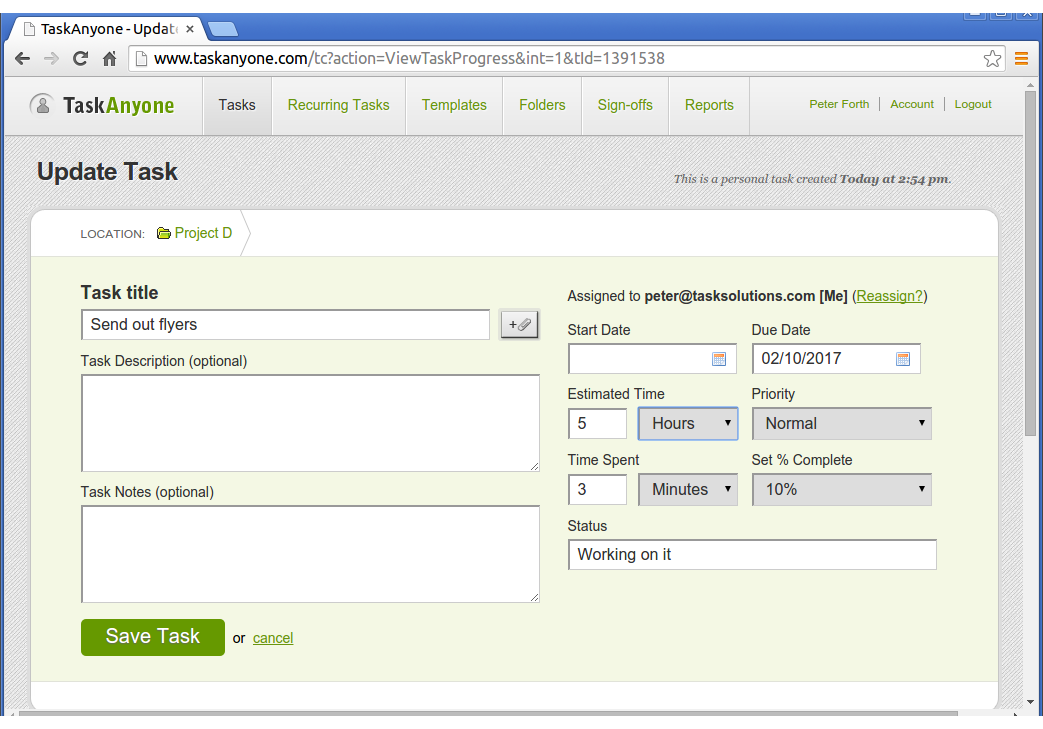
Task History page
This is the page which comes up if you click on a completed task in your task list or if you select it in the task menu. It shows all the task's details, as well as a history of activities on the task (when it was created, modified, completed etc).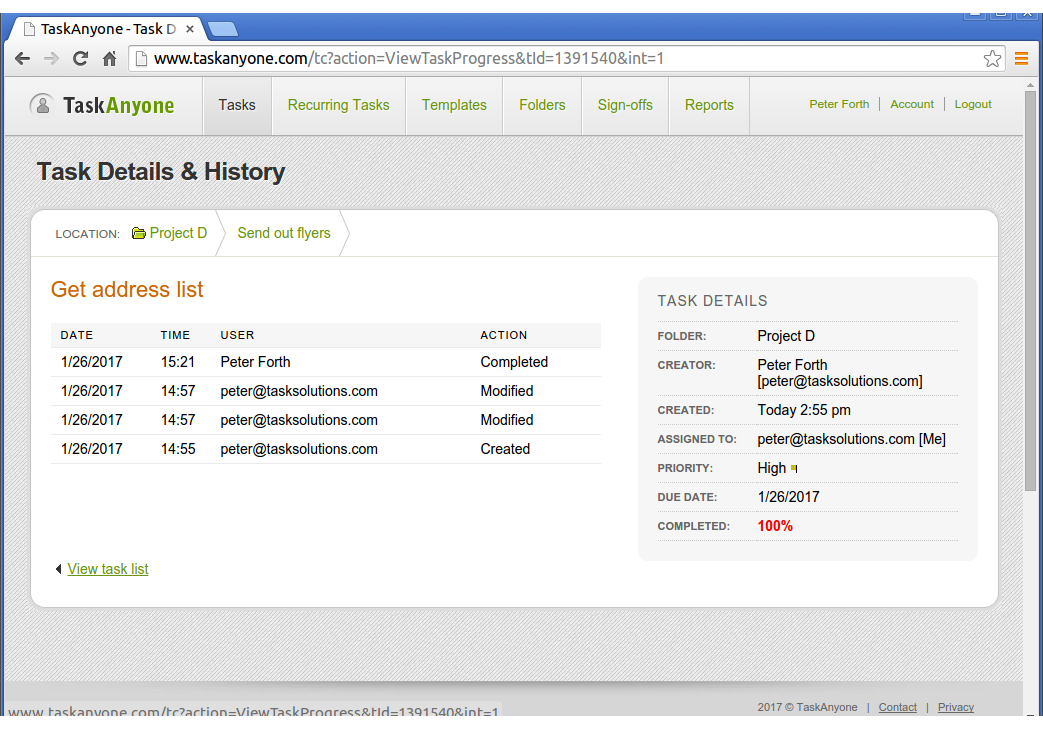
Completing Tasks
You can complete a task in the following ways:- Use the completion button on the Task list page to complete a task quickly without needing to reload any pages.
- From the Respond to task page
- From the Update task page
If you complete a task you will automatically complete any of its uncompleted subtasks.
Note that task that have been completed for more than 24 hours will automatically be hidden in your task list by the standard filter settings in your task list.
Set Status page
By clicking on a task's status in the task list you will allow you to change it. This page will also show you a history of all status changes that this task has undergone.Reassign task page
By clicking on the current task owner in the task list, or by clicking to re-assign the task in the Update Task page you can reassign a task to someone else or change the people that the task has been cc'ed to. If you specify multiple owners in the assigned to field then the task ownership will be shared by all those people (each task can be assigned to up to 5 people and cc'ed to up to 2 people).Be careful reassigning tasks that other people have sent to you--if you still want to be able to see the task after you reassign it then you should make certain you include yourself in the cc list. If you still want to be able to modify the task after you reassign it then you should make certain that you are a co-owner of the task.
Attaching files to tasks
You may attach a up to one file to each task. Attachments can be uploaded either while creating the task (by clicking on the paperclip icon), or when updating the task. Each user can manage all of his uploaded files from a central location under the Account -> files tab.Custom Folders
TaskAnyone has two different kinds of folder: standard folders such as your inbox that cannot be altered, deleted or shared and custom folders.Your Folder List
To edit your custom folders click on the "Folders" tab. This will bring you to a page in which you can add new folders, rename and delete existing folders and share folders with other TaskAnyone users.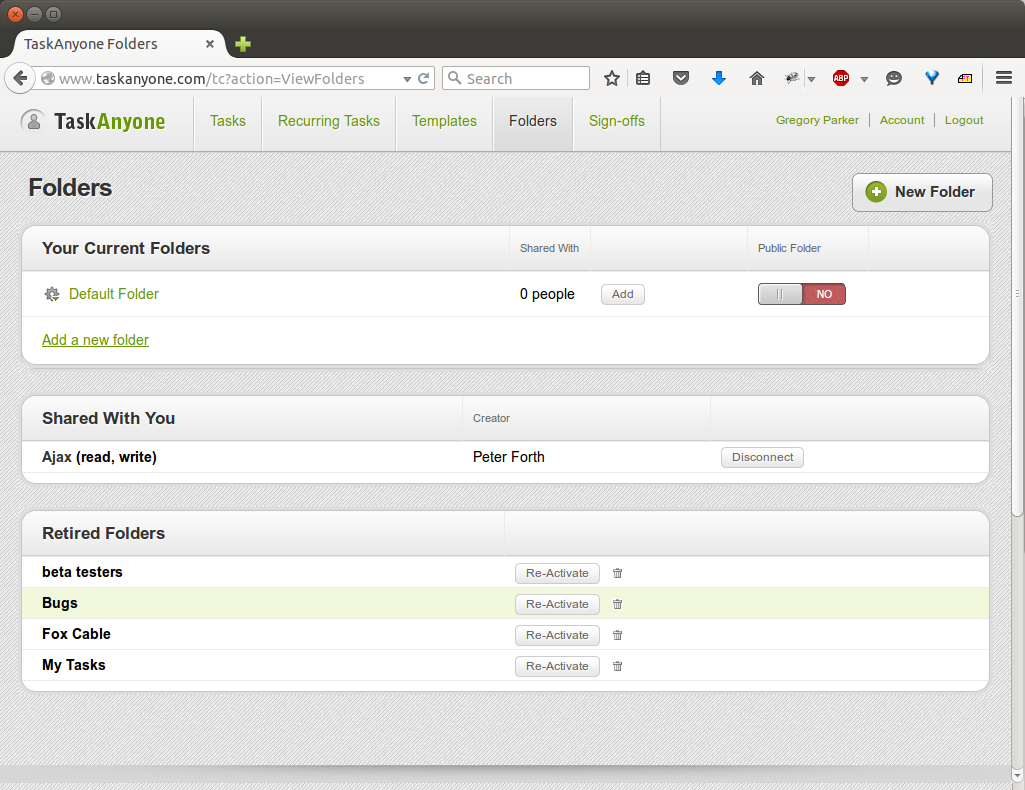
You will only be able to delete a folder if it is completely empty. If you are trying to empty a folder out in advance of deleting it you might need to adjust your filters so that you can see tasks that were completed more than 24 hours earlier
You will also be able to see folders that other users have shared with you. If you wish to stop seeing one of these folders you can click on the disconnect link.
Sharing Folders
You will be able to share folders with anyone who has a TaskAnyone account (unlike receiving tasks, you must have an account to view a shared folder).
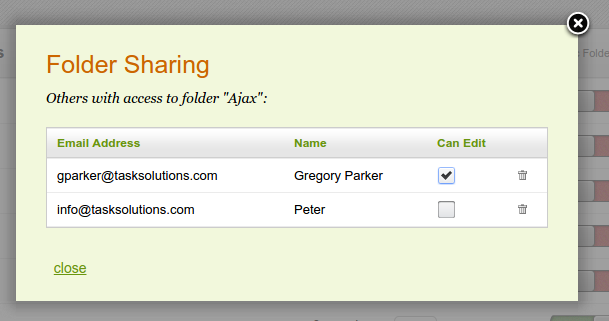
When you share a folder you can specify whether or not a user has write permission in the folder. If a user has write permission they will be able to edit/modify any task that is in the folder as well as create new tasks within the folder.
If you want to change who has access to your folder simply hit the "edit" link next to the "add" link for that folder. You can remove a user's access and add or remove write permission at any time.
Public Folders
When a folder is made public it is given a public facing url that will allow people to view all the tasks in the folder in a read-only fashion without requiring them to log into TaskAnyone. This is a perfect way to share your deliverables with users and clients.Retiring Folders
When you are done with the tasks in a folder you can "retire" the folder. When you do this, the folder remains but does not stay on any of your active views.Archiving Folders
You can invoke an archive operation on a folder from the folder list page. When you archive a folder named "bob", a new retired folder called "bob-archive" is created and all task trees that have been completed for more than 2 weeks are moved into it. The purpose of archiving is purely to increase task list refresh speed for customers that have lists with large numbers (>1000) completed tasks.Recurring Tasks
A recurring task is an automatic task generator that is used to create new tasks on a regular basis.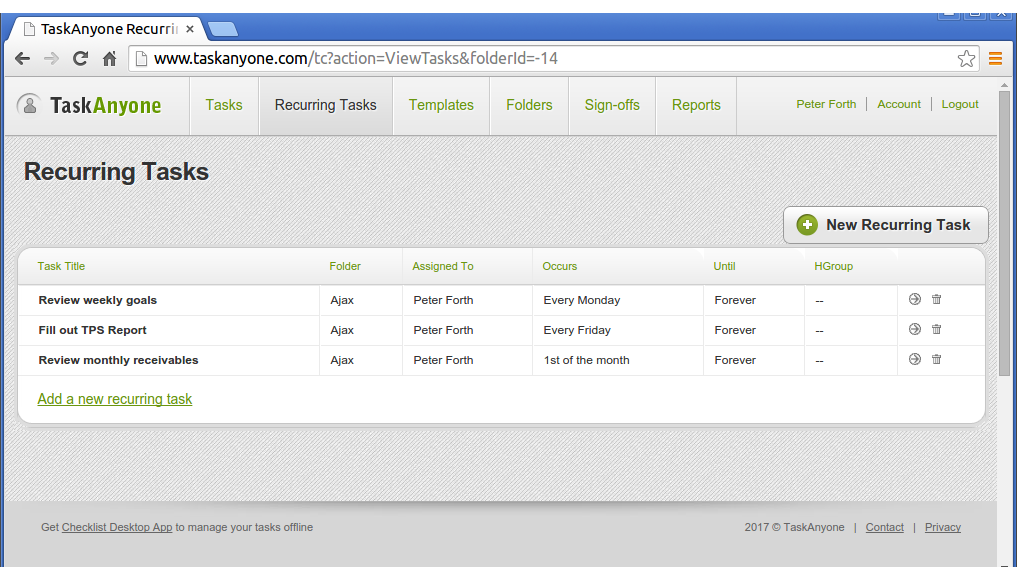
- In TaskAnyone you can see all your recurring tasks in the Recurring Tasks folder.
- To create a recurring task go to the Recurring Tasks tab and click "Add a new recurring Task".
- Every recurring task contains standard task elements such as title, description, notes, assigned to, estimated time and priority. These elements are used to generate new tasks on specific dates.
- Recurring tasks can generate tasks on a daily, weekly, monthly or annual basis. Some example recurrance dates are "Fridays", "Weekends", "On the 4th of the month", "3rd Saturday of the month", "Every Feb 4th".
- Recurring task are found in the Recurring tasks folder but the tasks that they generate are created in your regular folders. Specifically, each recurring task has a "Destination Folder" in which it will create tasks.
- The start date and due date in a recurring task are specified as an numberical offset from the recurrance date (the date it spawns a new task). For example if the recurrance is set to "Mondays" and the due date is set to +2 days would create a new task every Monday that is due 2 days later (Wednesday).
- Tasks that are set to occur on a particular day of the month can be set to occur on the last weekday before that. For example if the 5th is a Sunday, the task will be made on Friday the 3rd. Our intranet solution also allows you to create additional holidays that you don't want recurring tasks to be made on.
Here is a sample page that shows how you edit a Recurring Task:

Templates
A template is used to create a group of tasks that you want to use over and over again. For example you could create a template called "New Sale" and use it to create a group of tasks that you want to do every time you have a new sale. Templates are similar to Recurring tasks in that both of them are used to generate new tasks in your task list, the difference being is that recurring tasks make single tasks that are generated automatically at regular intervals whereas templates are groups of tasks that are generated manually on an as-needed basis.Your Templates
The Templates tab show a list of your current templates. Click on a template in order to edit the tasks that it will create. You can also share your template with people to allow them to generate tasks from them too.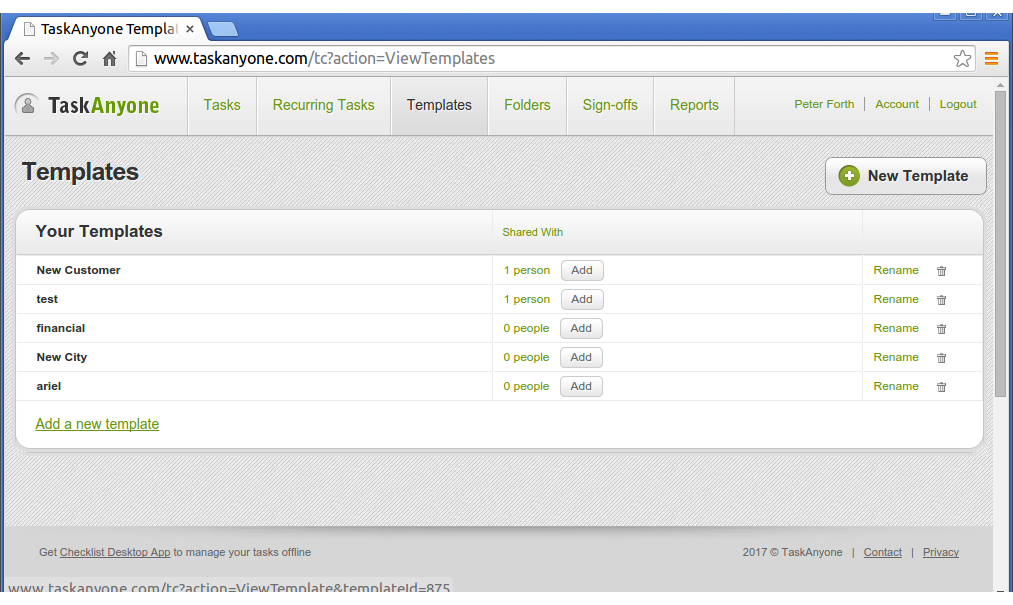
Editing a Template
The list of tasks you see when editing a template looks much like your regular task list. Just like recurring tasks however they are not full tasks at this stage, just frameworks used to generate tasks. That means you cannot mark them as complete in this view. It also means that things like start date and due date are integer offsets, not actual dates. For example if a due date is set to +2, then each time when you generate tasks from this template it will create tasks with a due date that is 2 days after the "base date" that was supplied when the tasks were generated.Also, unlike a task in your task list, while you are editing a template you do not always have to supply an email to identify the owner of the task. Instead what you can do is supply a "role". A role is a simple one word name like "sales", or "dev". Using roles allow you to assign tasks to different emails each time you generate tasks from the template.
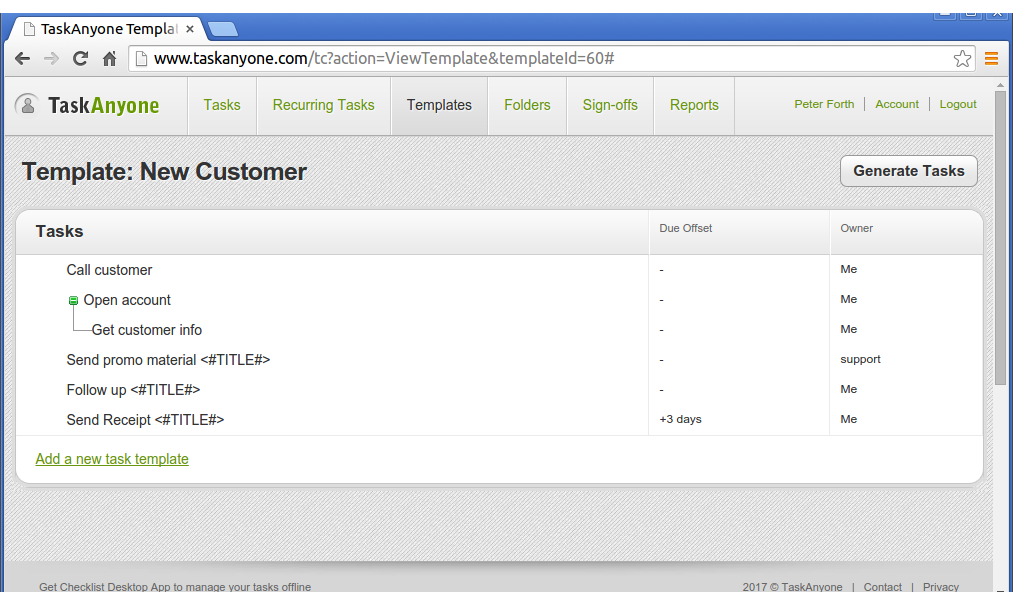
Generating Tasks
When you are ready to create tasks from your template simply click on generate tasks to see this popup: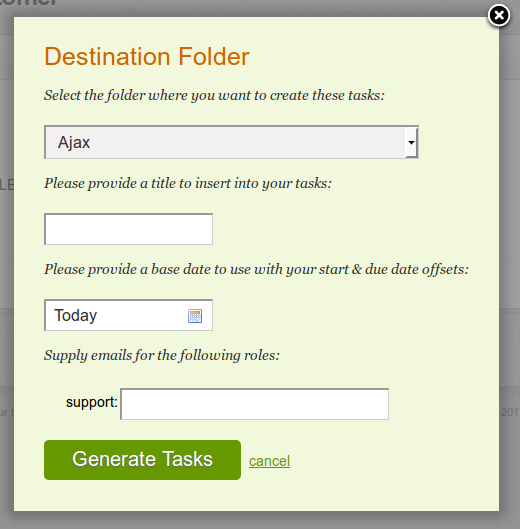
At generation time you may be prompted for some of the following data:
- A destination folder to make the new tasks in.
- If you have used any "roles" for the owners of your tasks, you will be asked to supply email addresses for those roles each time you generate tasks from the template.
- If you have used a start date or a due date (integer offset) you will be prompted for a base date to use as the starting point for those offsets. The default value for the base date is the current day.
- If you have used the special tag <#TITLE#> in any of your titles or descriptions, you will be able to make a subsitution for it. This allows you to generate new tasks that have slightly different values each time. For example in a "New Sale" template you could use this tag to fill in the new customer's name in the titles of some of your tasks.
Sign-offs
TaskAnyone allows workflows in which not only does an employee have to complete task that he has been assigned but a manager must also sign off on those tasks to confirm they have been completed correctly.Folder Managers
Sign-off functionality starts on the folders page. Using the drop down menu accessible for each active folder, you can designate users as "Folder Managers". A folder manager has the responsibilty of signing off on any tasks in the folder that have been completed.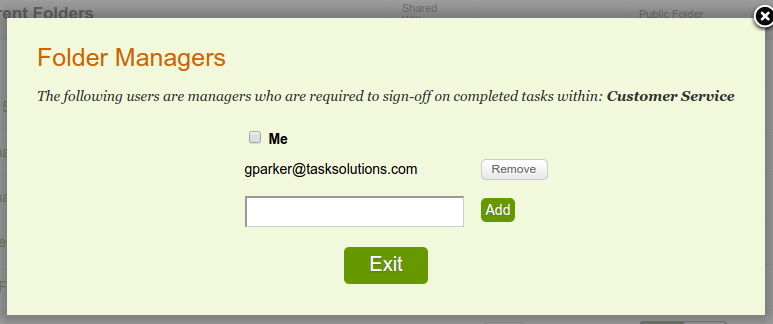
Requesting signoffs
Should you complete a group of tasks and want your manager to sign off on them, you can send them a message by pressing the "Request Sign-off" button at the bottom of your task list.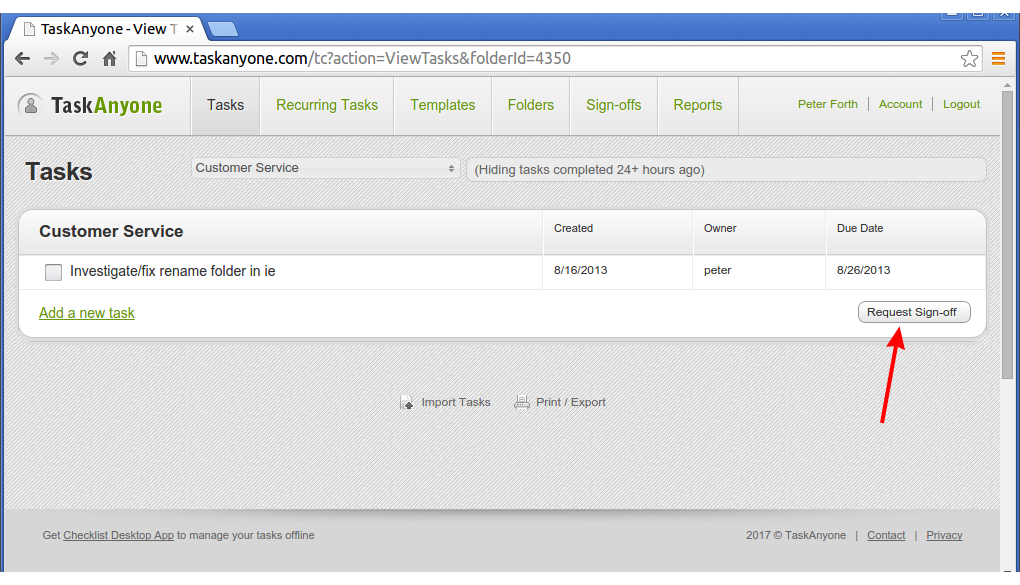
Manager Signoff Overview
Clicking on the Sign-offs tab shows you a list of folders that you have been designated the "Folder Manager" for and for which you have the right to sign off tasks in.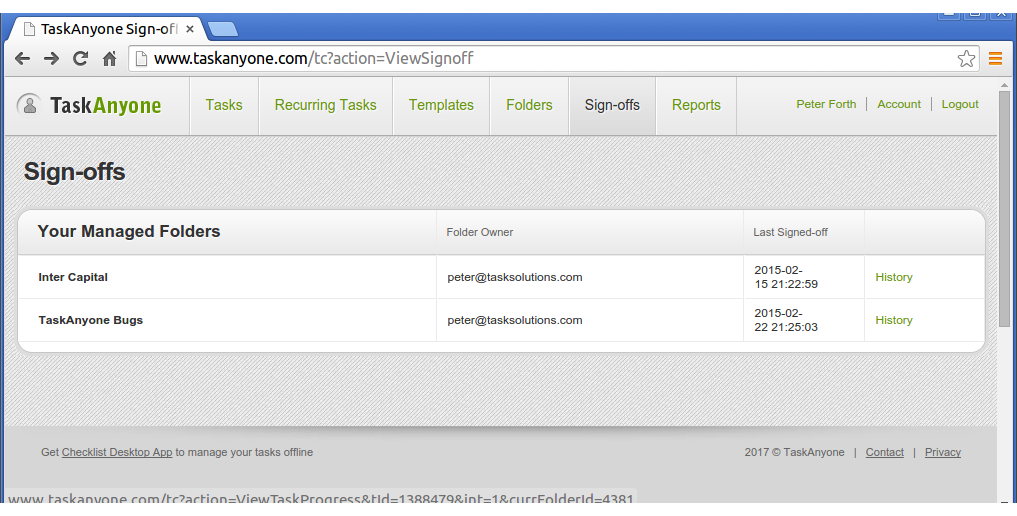
Signing off
From the Sign-off tab, clicking on one of the folders in your folder list will bring you to that folder's sign-off page. This page will show you all tasks in the folder that have not been previously signed off on. You have the opportunity to either complete or uncomplete any of these tasks at this time. When you are satisfied that all the tasks that are marked as completed actually have been, then you can press the "Sign-off" button at the bottom of the page. This will sign off on all the completed tasks in the list (note that you cannot sign-off on a task that you yourself have completed).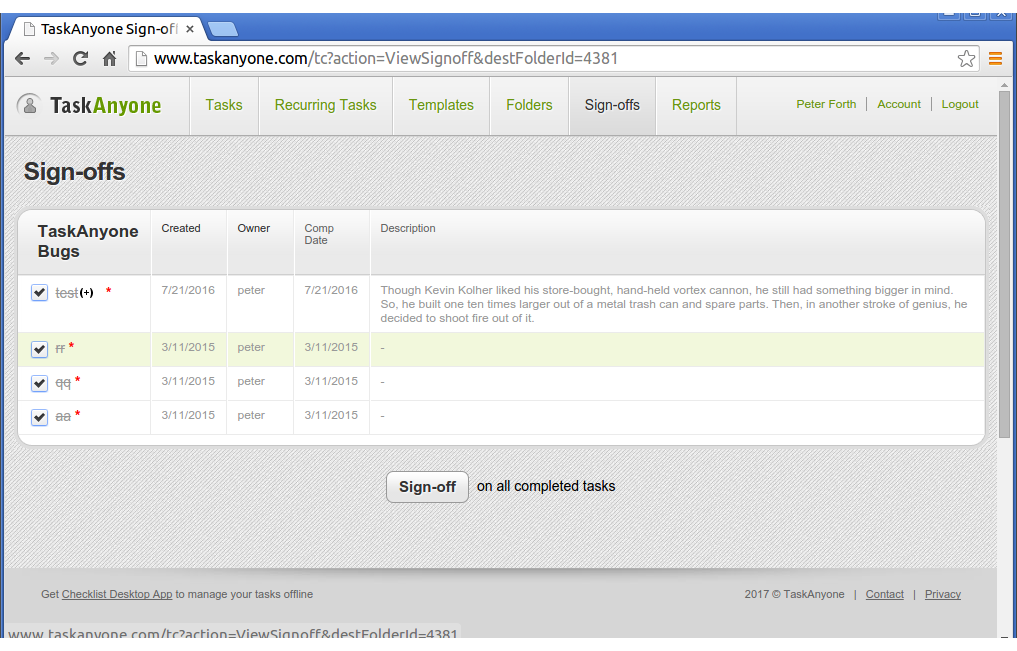
Sign-off History
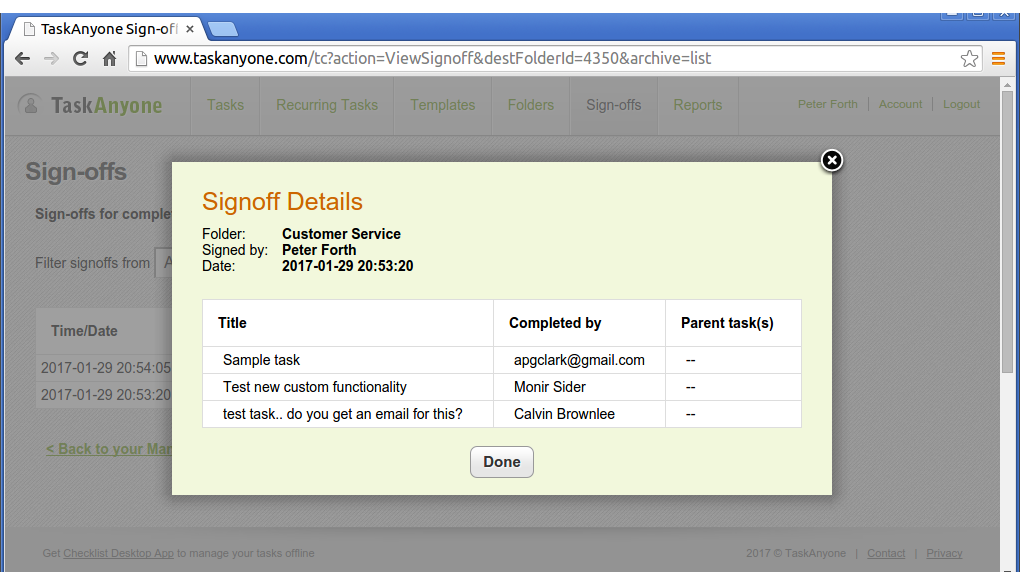
Each folder shown in your list of folders you can sign-off on has a "history" link. Click on this to see all sign-offs that have occurred in the folder before, including how many tasks were signed off and how many tasks were still open at that time.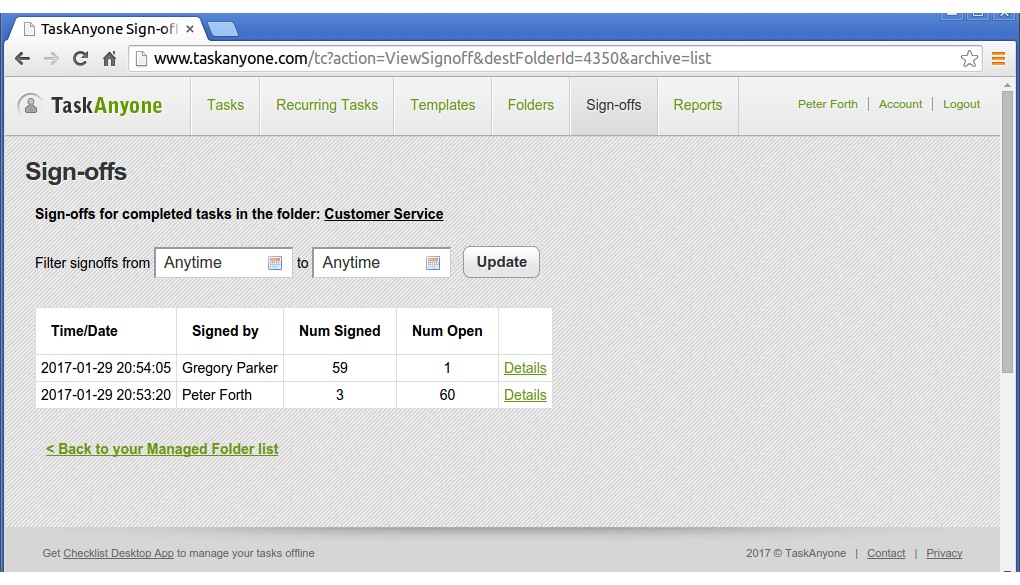 By clicking on each sign-off's "Details" link you can see exactly which tasks were signed off on, each time the sign-off button was pressed for the selected folder.
Account Settings
To go to your account settings click on the "Account" link in the top right. Your account settings page has 9 tabs:
Personal Emails
The "Address" tab in your account settings allows you to change your name and modify the email addresses that are associated with your account.Your account is associated with one primary email address. Your primary email address is the one that you register with and it is also your login name. If you have additional email addresses and you want tasks that have been assigned by other people to all go into one account, you can add additional email addresses. When you add an address, a validation email will be sent to that address to make certain that it was the owner of the address that made the request.
External Calendars
From the Personal Emails tab you can also get information on how to import any of your TaskAnyone tasks (that have due dates assigned to them) as all day events in external calendar programs.Task list Columns
On this page you can customize the columns that are shown on your task list. You can change the columns that are visible, the order that they appear in and also mark them as "auto-hide" so that they only show up if a task has some useful information in them.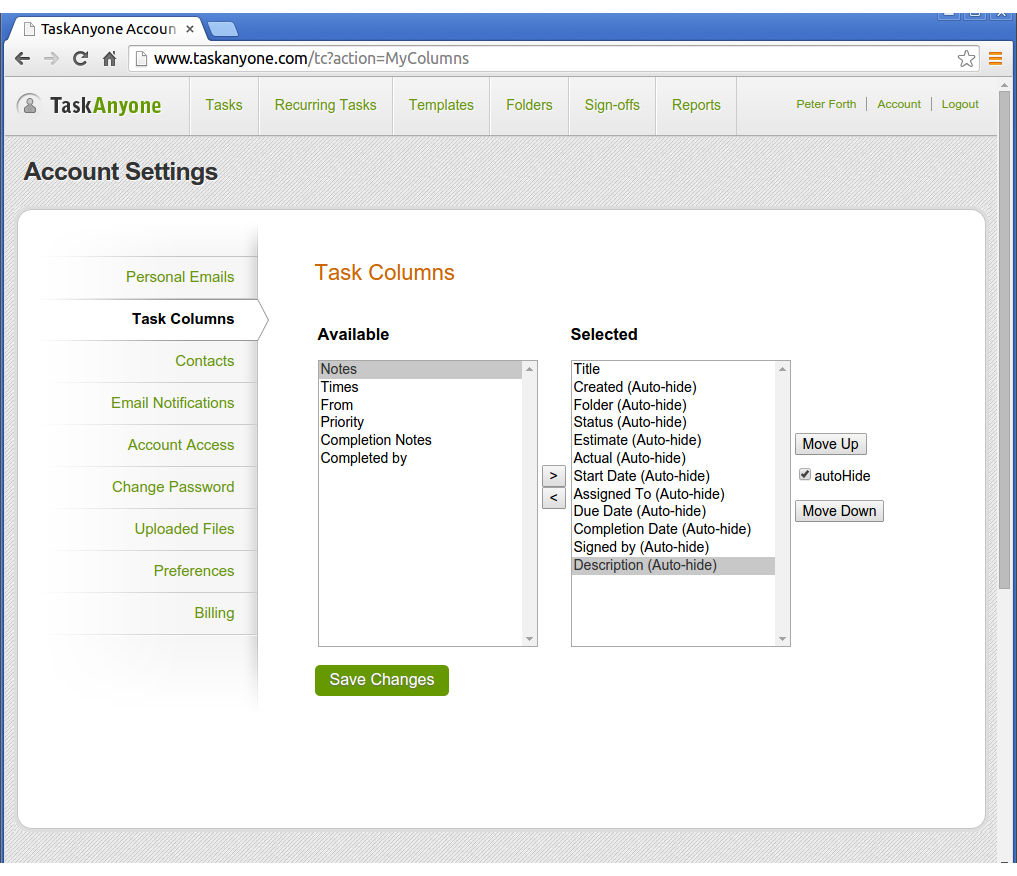
Contacts
You can add/remove and view all the emails in your contact list. Note that when you send a task to someone a dynamically populated dropdown is shown using this data to help you choose the email address of the person you are sending a task to. Most of the time your contact list gets filled automatically as email addresses are added every time you send a task to someone new, but if you have a large contact list you can also import it from this page as a csv (text) file.Email Notifications
From the "Alerts" tab you can customize the emails that TaskAnyone sends you.- You can turn on/off email alerts when someone sends you a new task.
- You can turn on/off email alerts when someone changes a task you have sent them.
- You can request that the emails that are sent to you have no graphics in them. This will help people whose email systems don't display our email graphics well or whose email servers won't deliver emails with embedded images.
- You can set the system to send you a new task email on that tasks start date (if it has one) instead of when it is first created.
- You can turn on/off your Daily Status emails.
- You can set your Daily Status emails to send you all your outstanding tasks, not just the one's that are immediately due.
Account Access
On this tab is functionality that will let you request "management" access to other people's accounts. When someone grants you management access to their account you can click on their email address in your employee's list and be logged in directly as that person--you can essentially "become" that employee. (Note that if you wish to get back to your own account you will have to log out of your employee's account and then log back into your own account manually).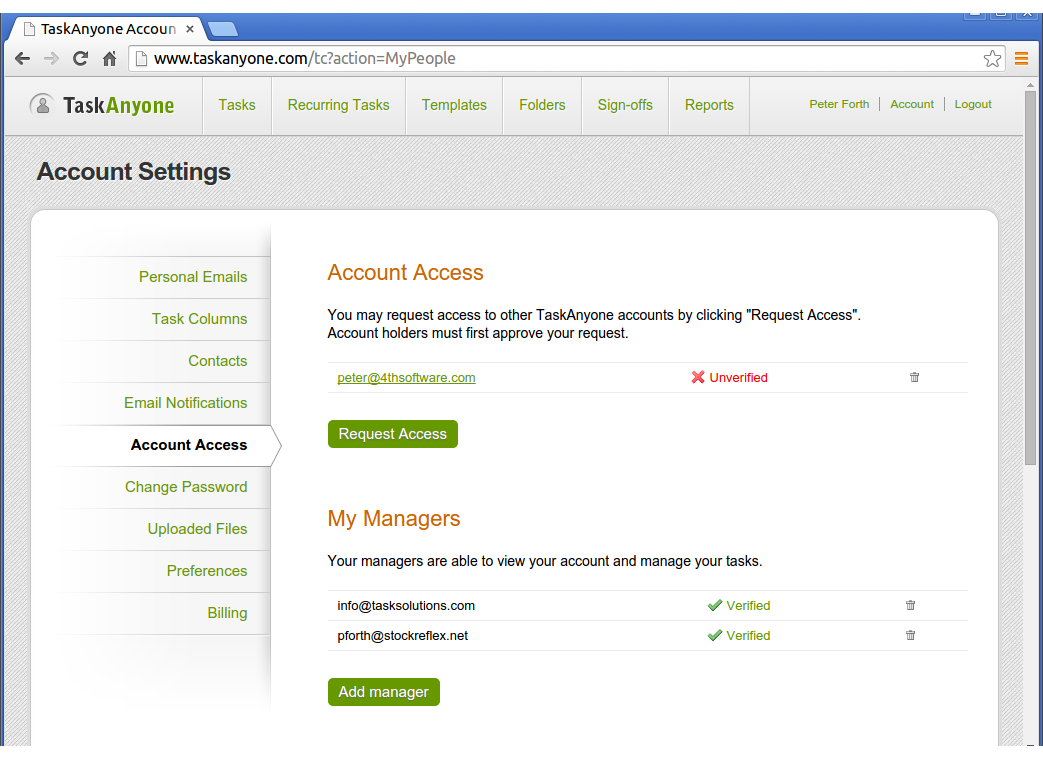
At this time TaskAnyone has no direct knowledge of any one of our customer's corporate structure. Because we have no way of policing this, manager's will initially require their employee's permission to be granted management access to their accounts. It is assumed that if an employee refused/forgot to grant their manager access it would be easily addressible within the customer's company and external to the TaskAnyone system.
Change password
You can change your password from the "Password" tab in your account settings.Uploaded files
When you attach a file to a task it is permenantly uploaded into the TaskAnyone system. This tab shows a list of all the files that you have uploaded and also allows you to manually delete them should you get close to filling your maximum file size quota.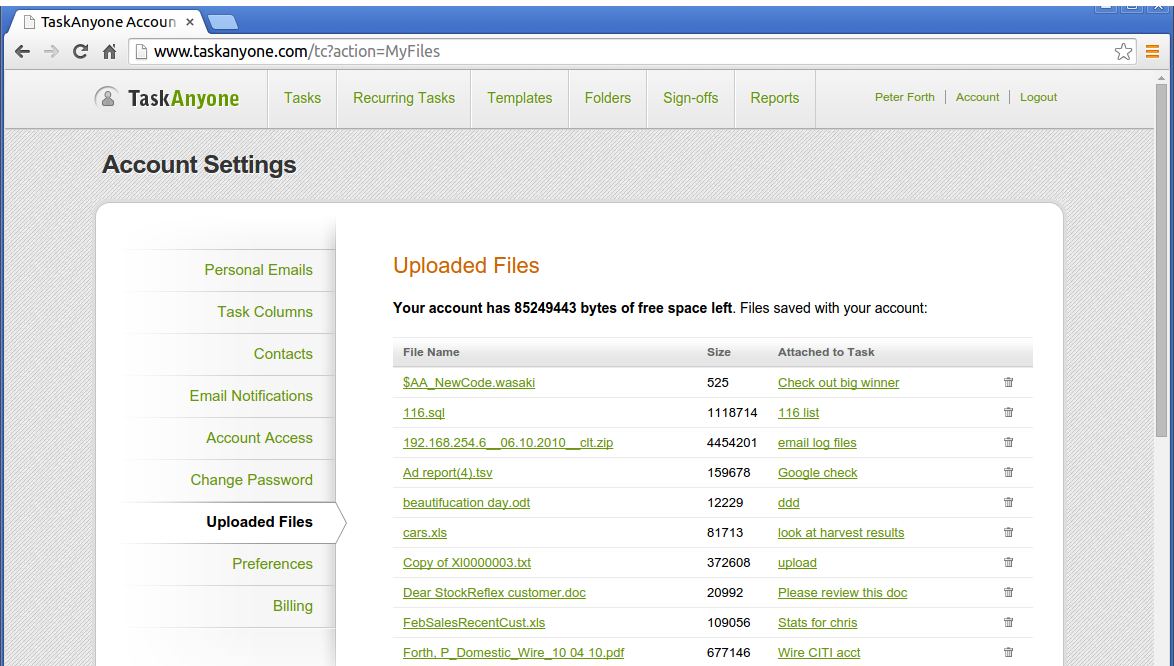
Preferences
There are two preferences on this tab:- Auto-Accept incoming tasks.
- Show the word "me" when viewing tasks created or assigned to me.
Billing
You can register your TaskAnyone account for a small monthly fee. If at any time you wish to cancel your registration, simply email our support line. All subscription cancellations will be processed at the end of the current calendar month.Purchasing while logged in
If you log into your trial account to make a purchase then your trial account will automatically be connected to your new license. If however you purchase using the link from our homepage and are not logged in, you will need to enter in the license code that is mailed to you when you next log into your account.Purchasing a single license
You can purchase TaskAnyone from any of the following links:- Select Purchase from the navigation bar on the TaskAnyone homepage.
- Select a "Buy Now" link from our Products and Pricing page.
- Log into your account and select Purchase from the main account navigation bar. Then press the green "Buy Now" button.
- If your trial account has expired you will be presented with a "Buy now" button when you first log in.
You may also wish to purchase one or more licenses of Checklist at this time. Unlike the TaskAnyone license this is a one time charge, not a recurring charge.
Purchasing multiple licenses
- After pressing the "Buy now" button you will have the option to select quantity of licenses you wish to purchase. You should buy one for each employee that you want to use the system.
- When you are finished making the purchase you will be emailed a license code with your purchase receipt.
- If your employees already have TaskAnyone trial accounts: tell them to log in, go to their Account Settings and select the purchase tab. Then they should click on the "Use Existing License" button and type in the license code that you were emailed in step 2.
- If your employees do not have TaskAnyone trial accounts: instruct each of your employees to sign up with a TaskAnyone trial account by going to the TaskAnyone homepage. When they validate their email address and enter in the password they want to use they will also be abel to enter in the license code that you were emailed in step 2.
Purchasing Intranet Licenses
To purchase an Intranet installation of TaskAnyone please talk to our sales team.Intranet
Intranet licenses are commonly used by customers for whom privacy, security and control are of the utmost importance. At TaskAnyone, Intranet customers are among our most important clients and we strive to supply them with top notch support and service. Every intranet installation contains an Intranet Administrator login that provides several additional functions that are not available to our internet SaaS customers.User Admin
The Intranet administrator has access to the full list of authorized users on the server and can activate/deactivate, reset their password or login to their accounts.User Groups
The Intranet product allows you to make named groups of users. Group names can then be used to assign or cc tasks or recurring tasks to an entire team.Holiday Groups
Recurring tasks that occur on a particular day of the month (like the 1st of each month) have a setting that allows them to be generated the first working day before that date, if the date falls on a weekend. Intranet users have the additional option of designating "Holiday Groups" - lists of holiday dates that can be used in addition to just looking at the day of the week in order to determine if the recurring task is set to occur on a non-working day.Intranet Reports
Multiple reports are available to desingated Intranet users that show statitics for task creation and completion across the installation. These reports include:- Individual Productivity
- Total Progress
- Task Completion
- Task Repetition
- Task Ownership
Checklist
What is Checklist?
Checklist is a downloadable product that allows you to edit your own personal task lists and save them to files on your local hard drive. Because you can enter in new tasks just by typing in the main task view screen and without needing to open a dialog, you can add tasks into Checklist very quickly--far faster than you can on a browser based system.To download and try Checklist: click here
Checklist and TaskAnyone
The latest version of Checklist now lets you connect directly to TaskAnyone. This gives you an alternative to logging onto TaskAnyone with a browser to access your tasks.When TaskAnyone clients choose to access their tasks through Checklist they get the following useful features:
- You can access your tasks with a single click on the Checklist icon in your system tray.
- Your tasks in Checklist update every 30 seconds, no need to hit the refresh button on your browser.
- If someone updates, completes or deletes a task you have sent them you are alerted with a little popup window--just like an instant messenger.
- If someone sends you a new task you also receive alerts.
- You can enter tasks in very quickly, without waiting for web pages to refresh. All changes that you make are buffered so there is never any wait time associated with an action.
- You can type in task titles into the main Checklist screen very quickly.
- In Checklist you can cut and paste tasks for quick and easy replication.
- Checklist has a better printing function for task lists than a browser does.
- In Checklist you can use a counter to automatically track the amount of time you spend working on a task.
- Assign tasks to other people.
- Share folders with other TaskAnyone users.
- Store your tasks on a secure hosted server instead of your local hard drive.
- Access your tasks from either Checklist or a web browser, from any computer anywhere in the world.
How to connect from Checklist
To connect to TaskAnyone from Checklist simply press the TaskAnyone button in the Checklist toolbar.
Once you've done that you will be prompted to enter in your TaskAnyone login name and password. That's all there is to it!
When you connect to TaskAnyone any local file that you may have been editing will be closed. Conversely if you chose to open a local file (for example using the standard File menu), then your connection with TaskAnyone will be ended.